Deploy WordPress with Amazon RDS
Module 1: Creating a MySQL Database with Amazon RDS
Details
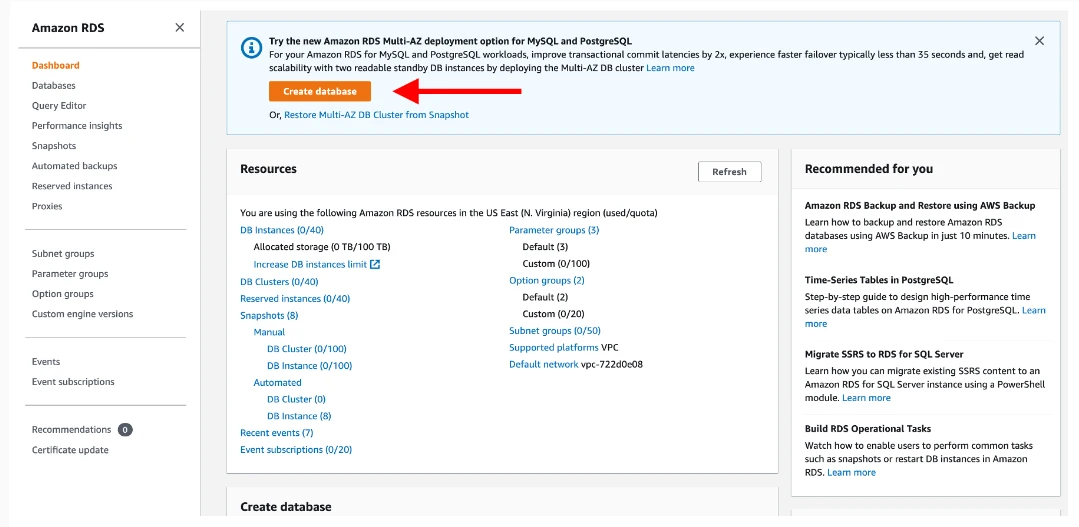
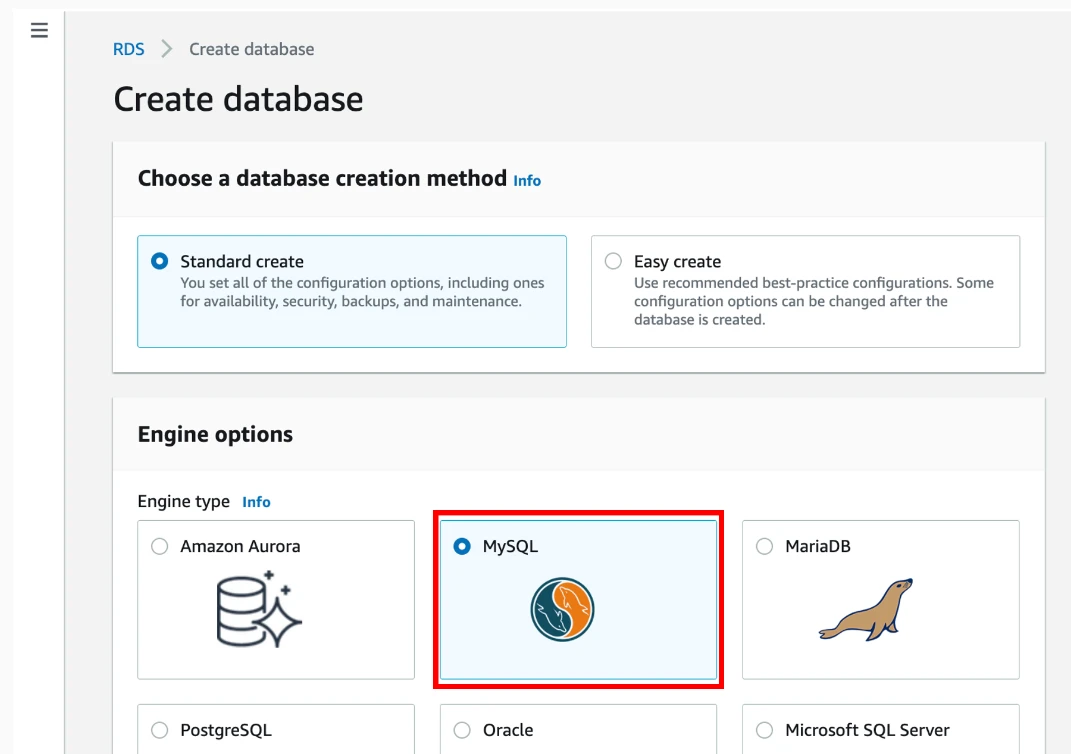
Creating a MySQL Database

Next, we specify the authentication settings, which include the database name, primary username, and password.
Next, we specify the authentication settings, which include the database name, primary username, and password.
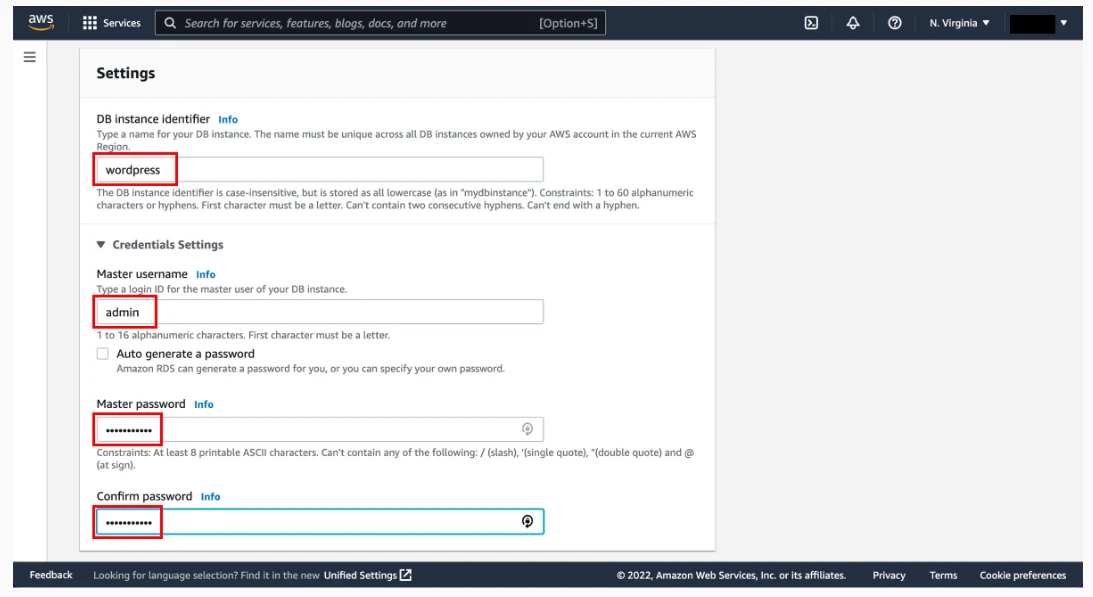
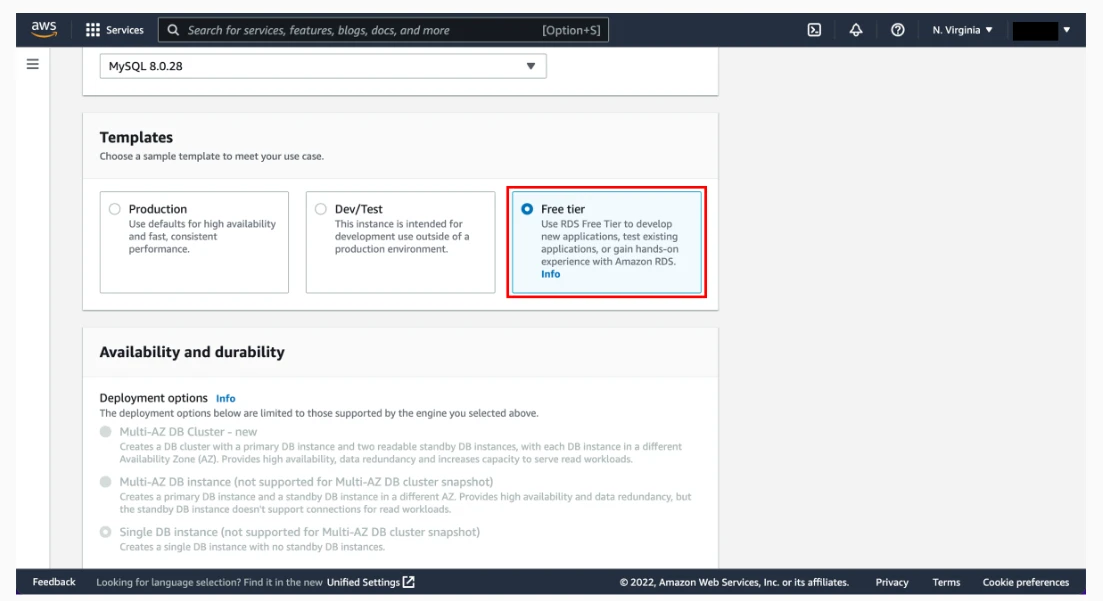
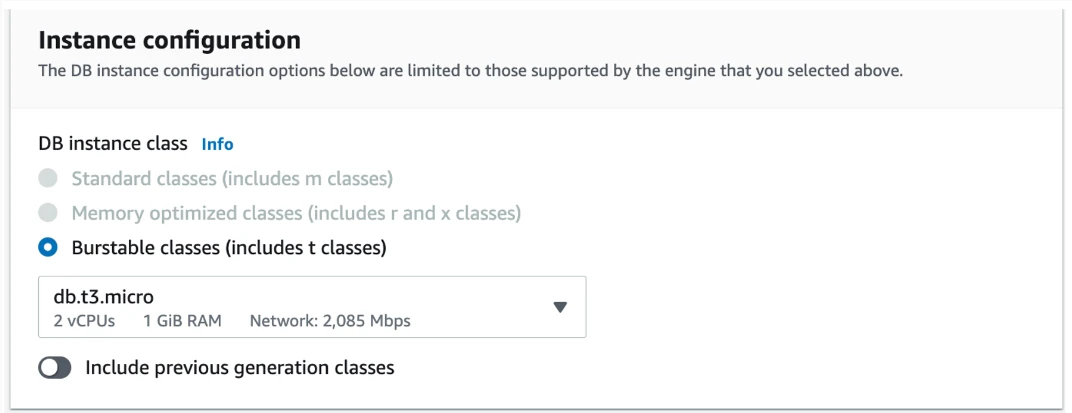
Once we set up the username and password, you can choose key details for your MySQL deployment, including the instance configuration and storage details.

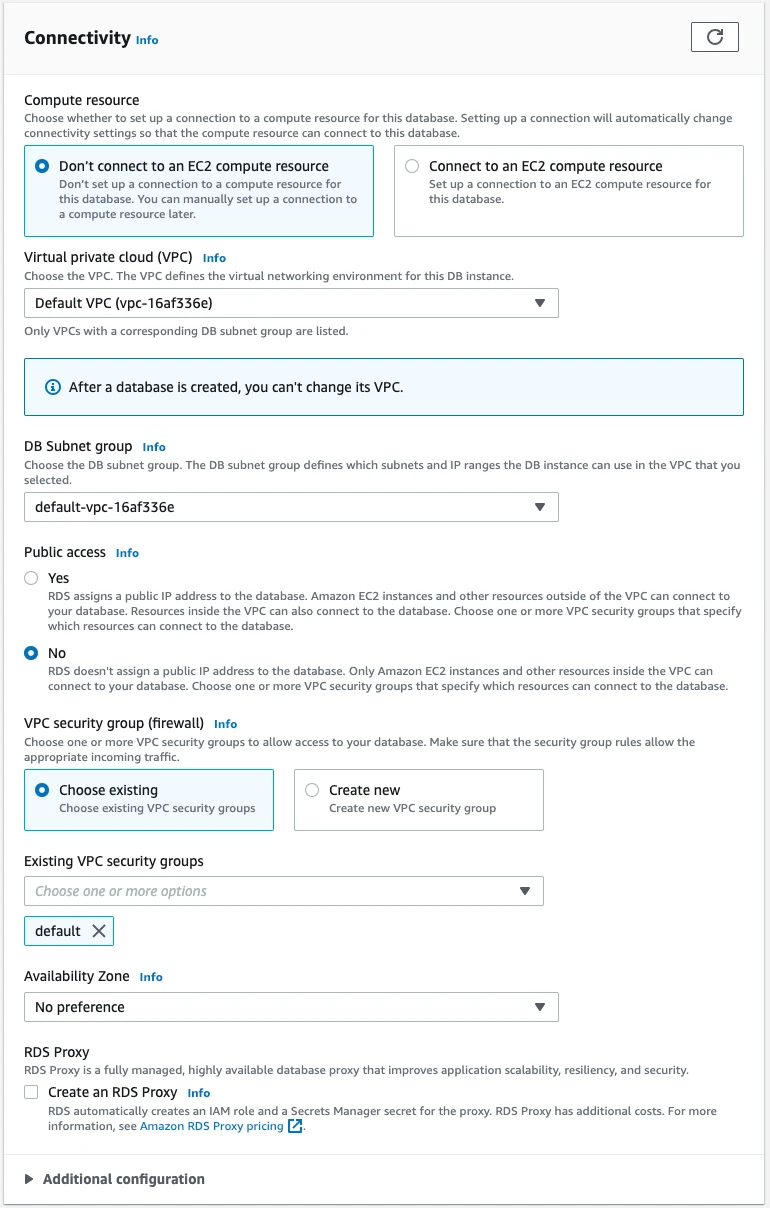
The Amazon RDS instance must be created in a VPC, which represents a logically separate network where our resources are located.
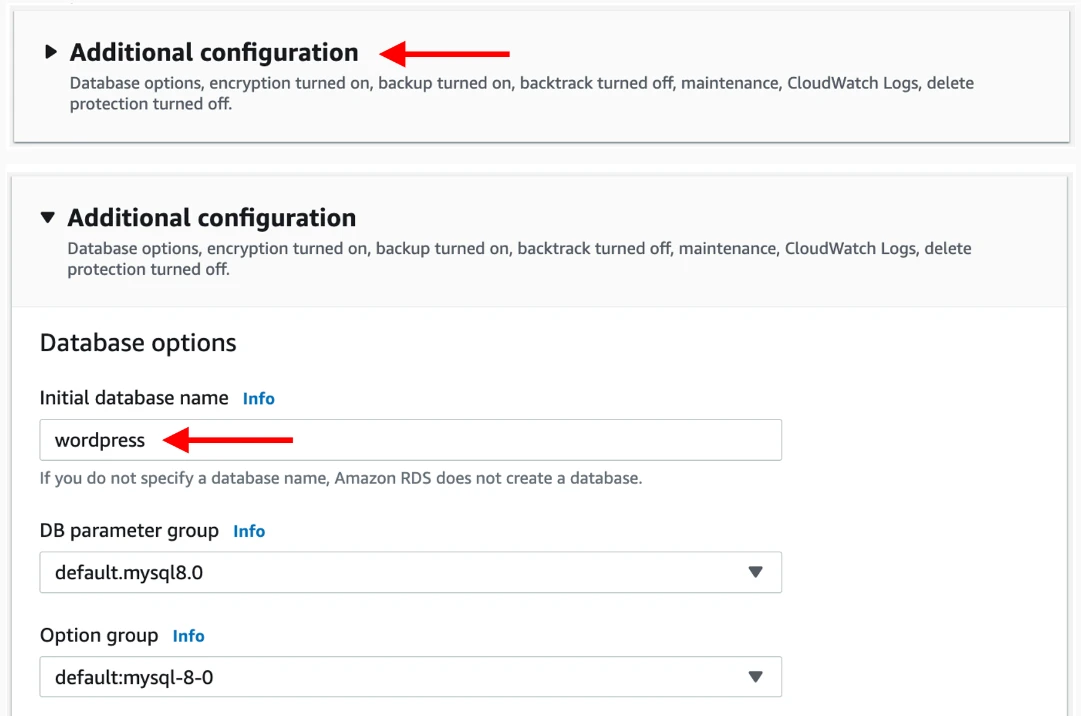
A change should be made to the “Initial database name” field to ensure that Amazon RDS creates our MySQL database upon initialization. We will use this name to connect to the database.
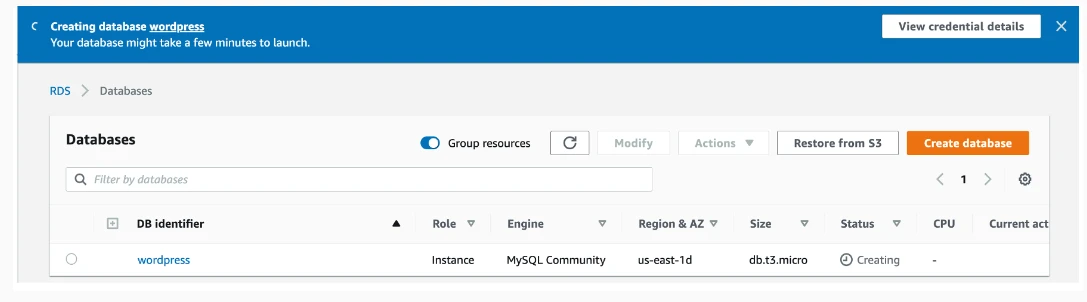
Next, click to create the database.
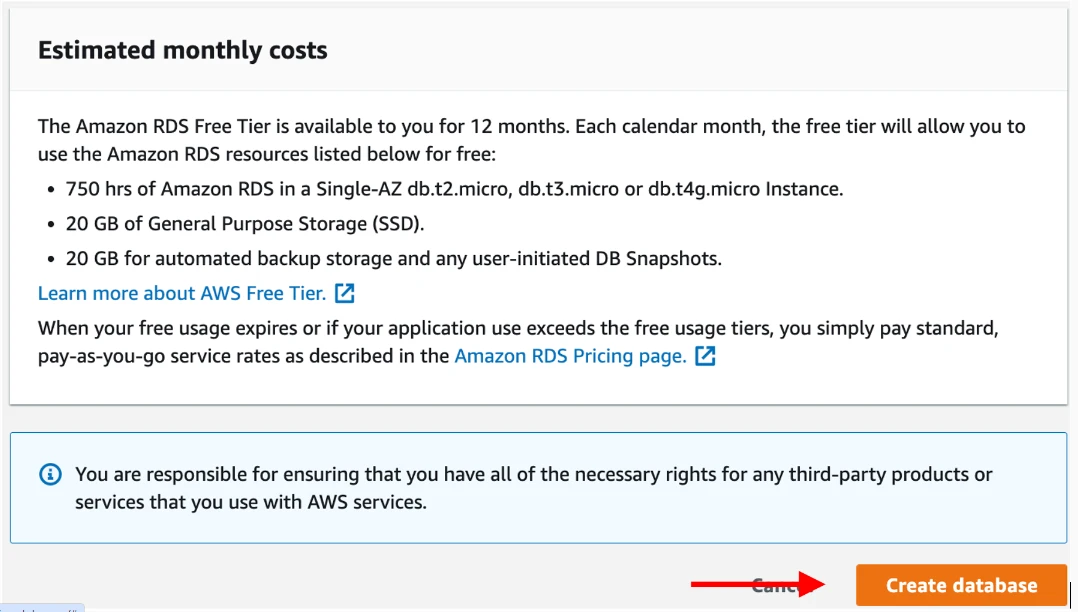
You should see a notification confirming the successful creation of the database
Module 2: Creating an EC2 Instance
Details
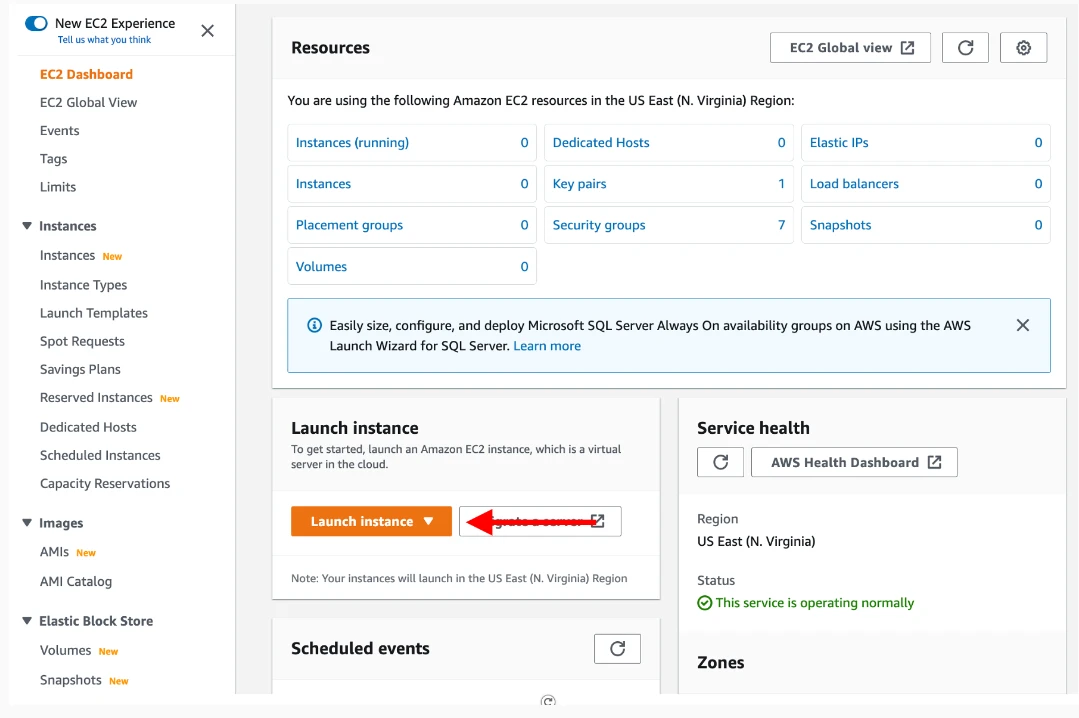
To create an EC2 instance, go to the Amazon EC2 Dashboard. Click on “Launch Instance.”
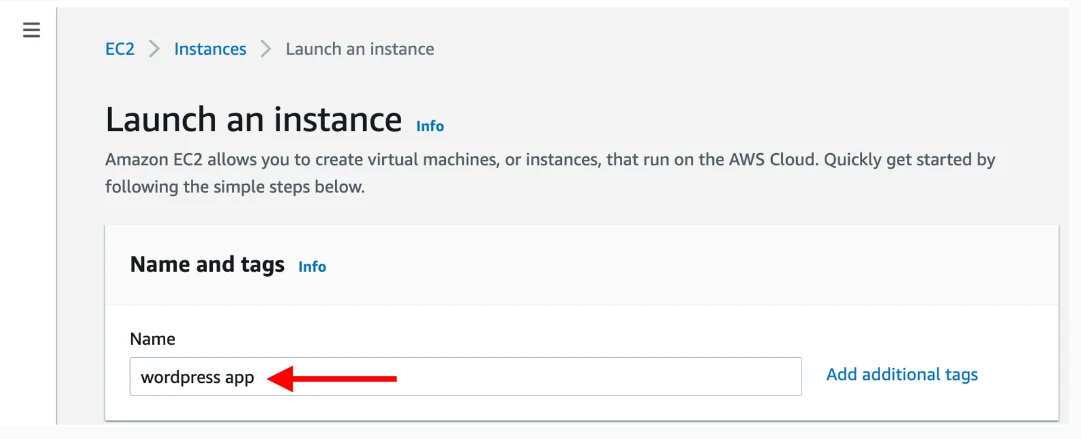
On the first page, name your instance.
From the available operating system options, select Amazon Linux 2 AMI (HVM) Free Tier.
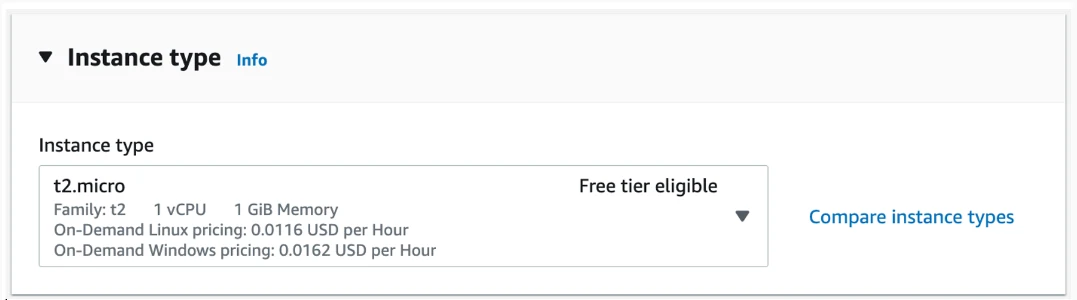
Next, choose the instance (t2.micro) Free Tier.
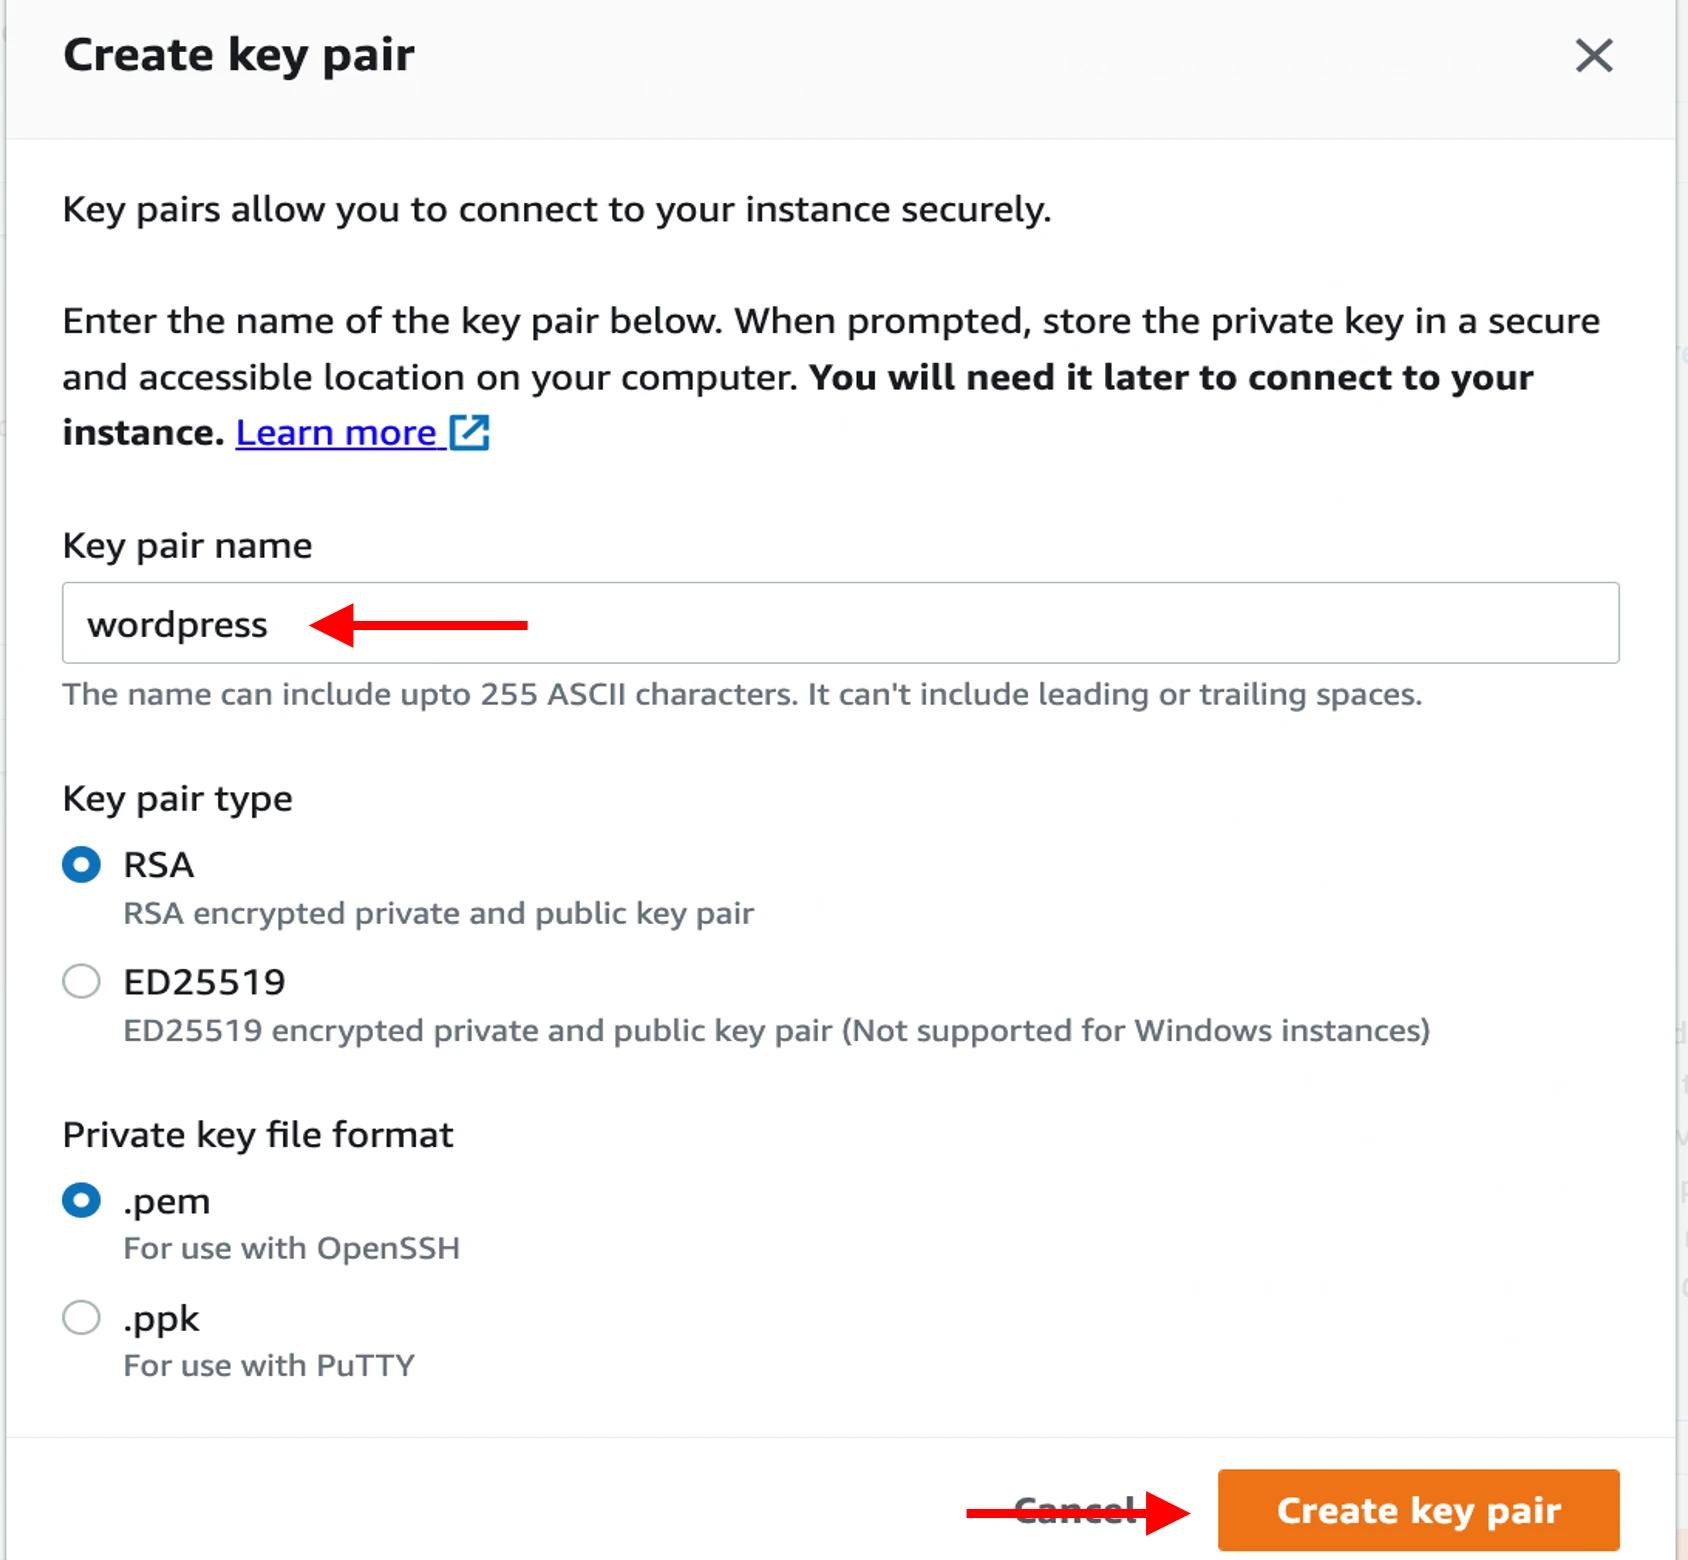
Configuring the SSH Key
Name the Key Pair and create it.

Name the Key Pair and create it.
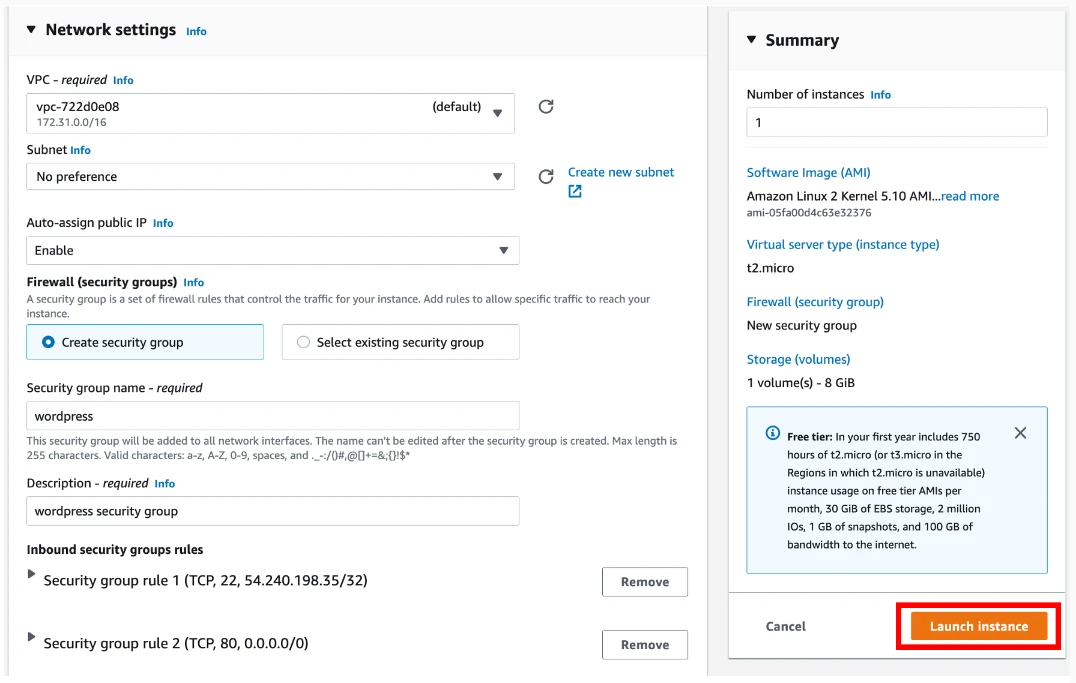
Configuring Security Groups and Launching the Instance
Allow SSH traffic from your IP address and HTTP from the Internet.
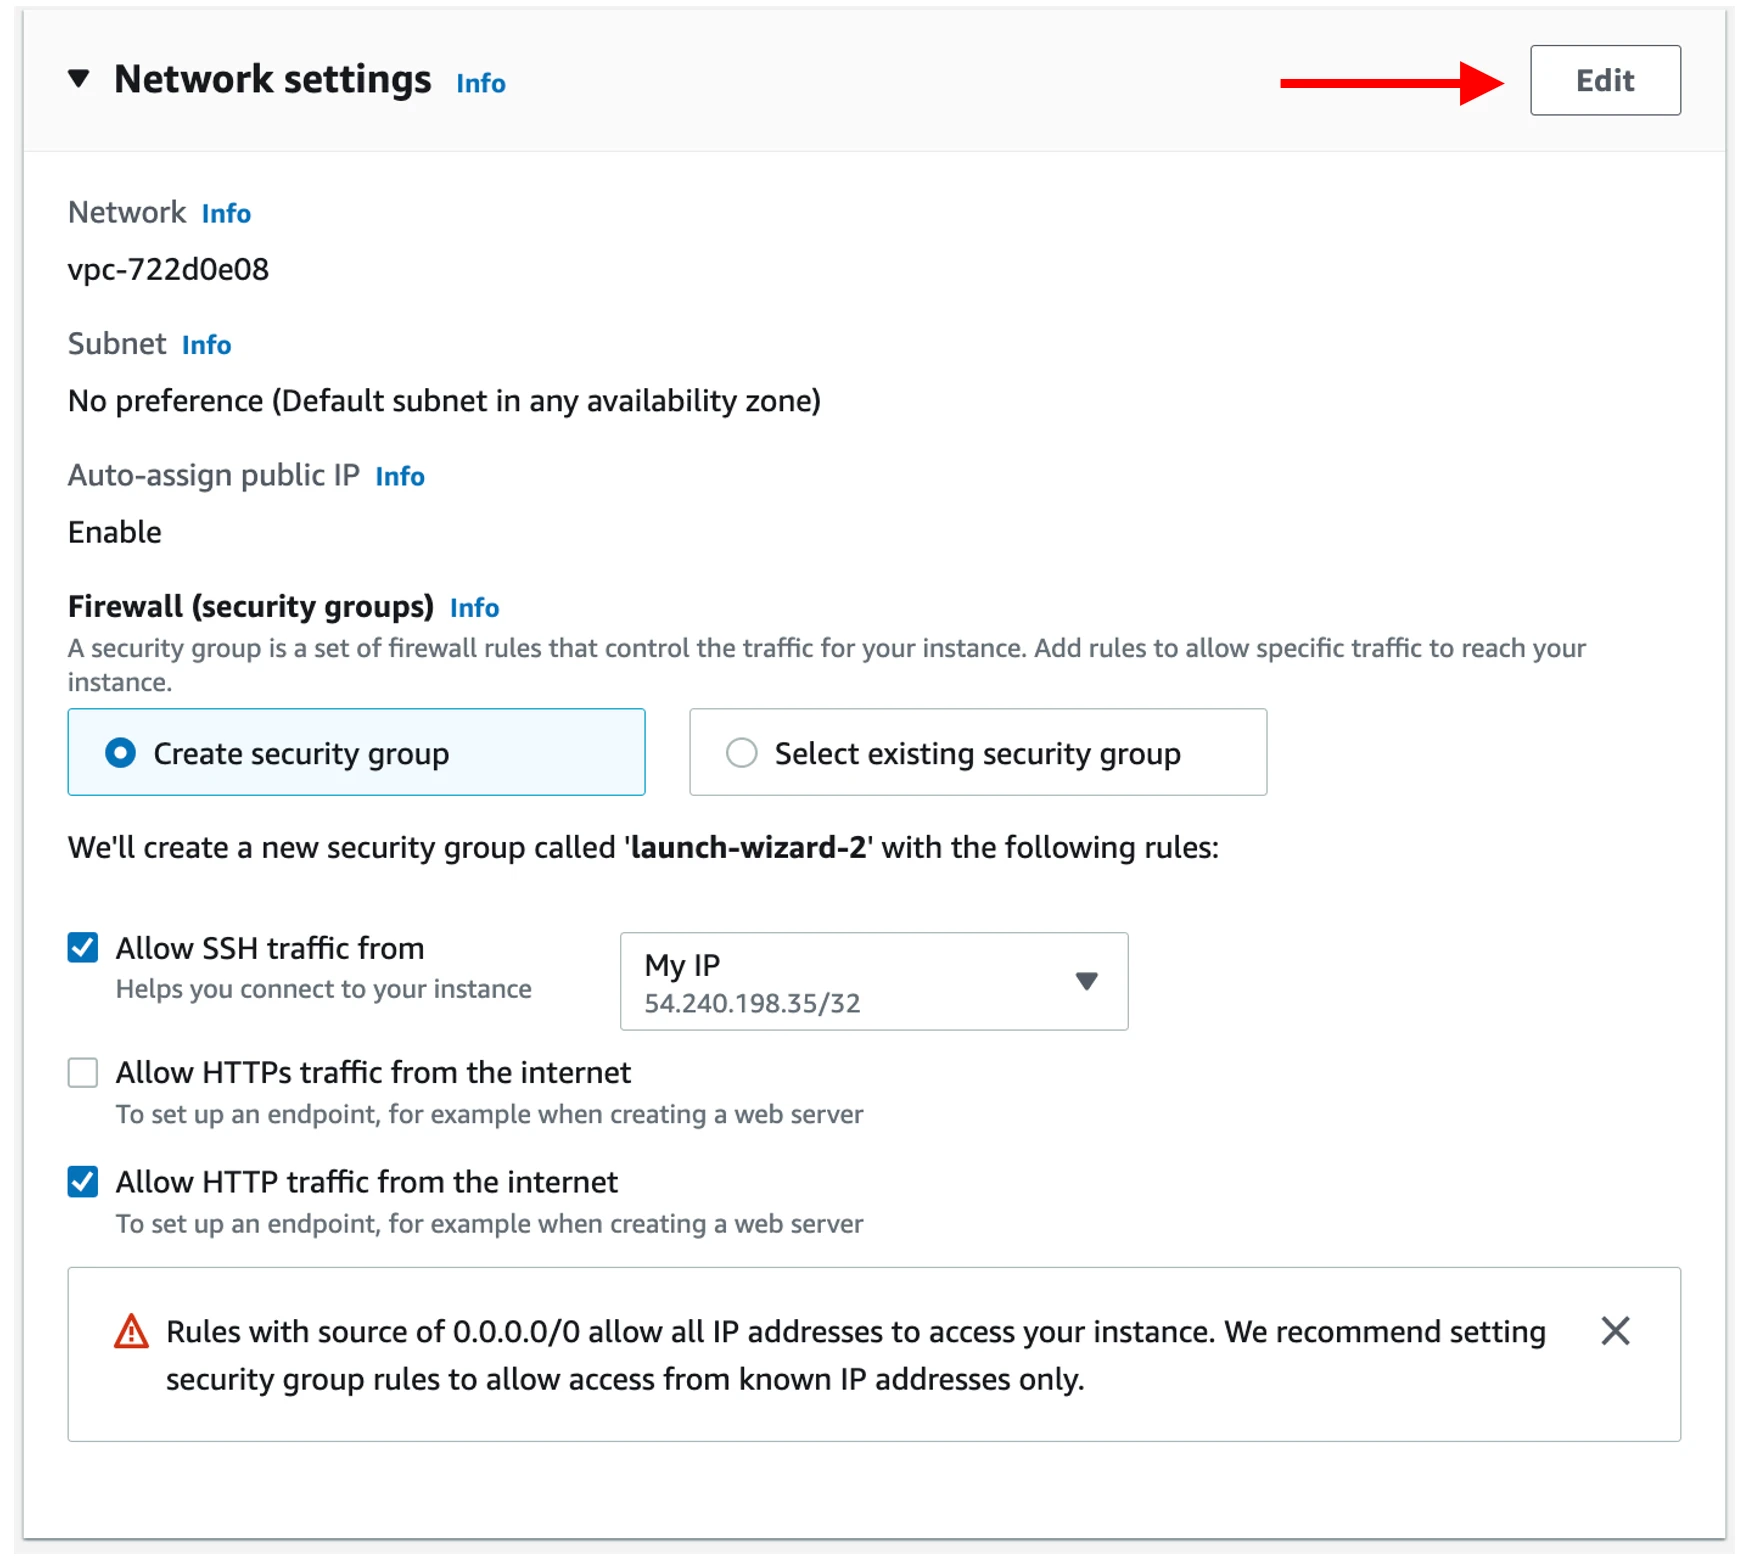
In the Network Settings section, change the Firewall (Security Groups) section, and enter “wordpress” in the Security Group name.
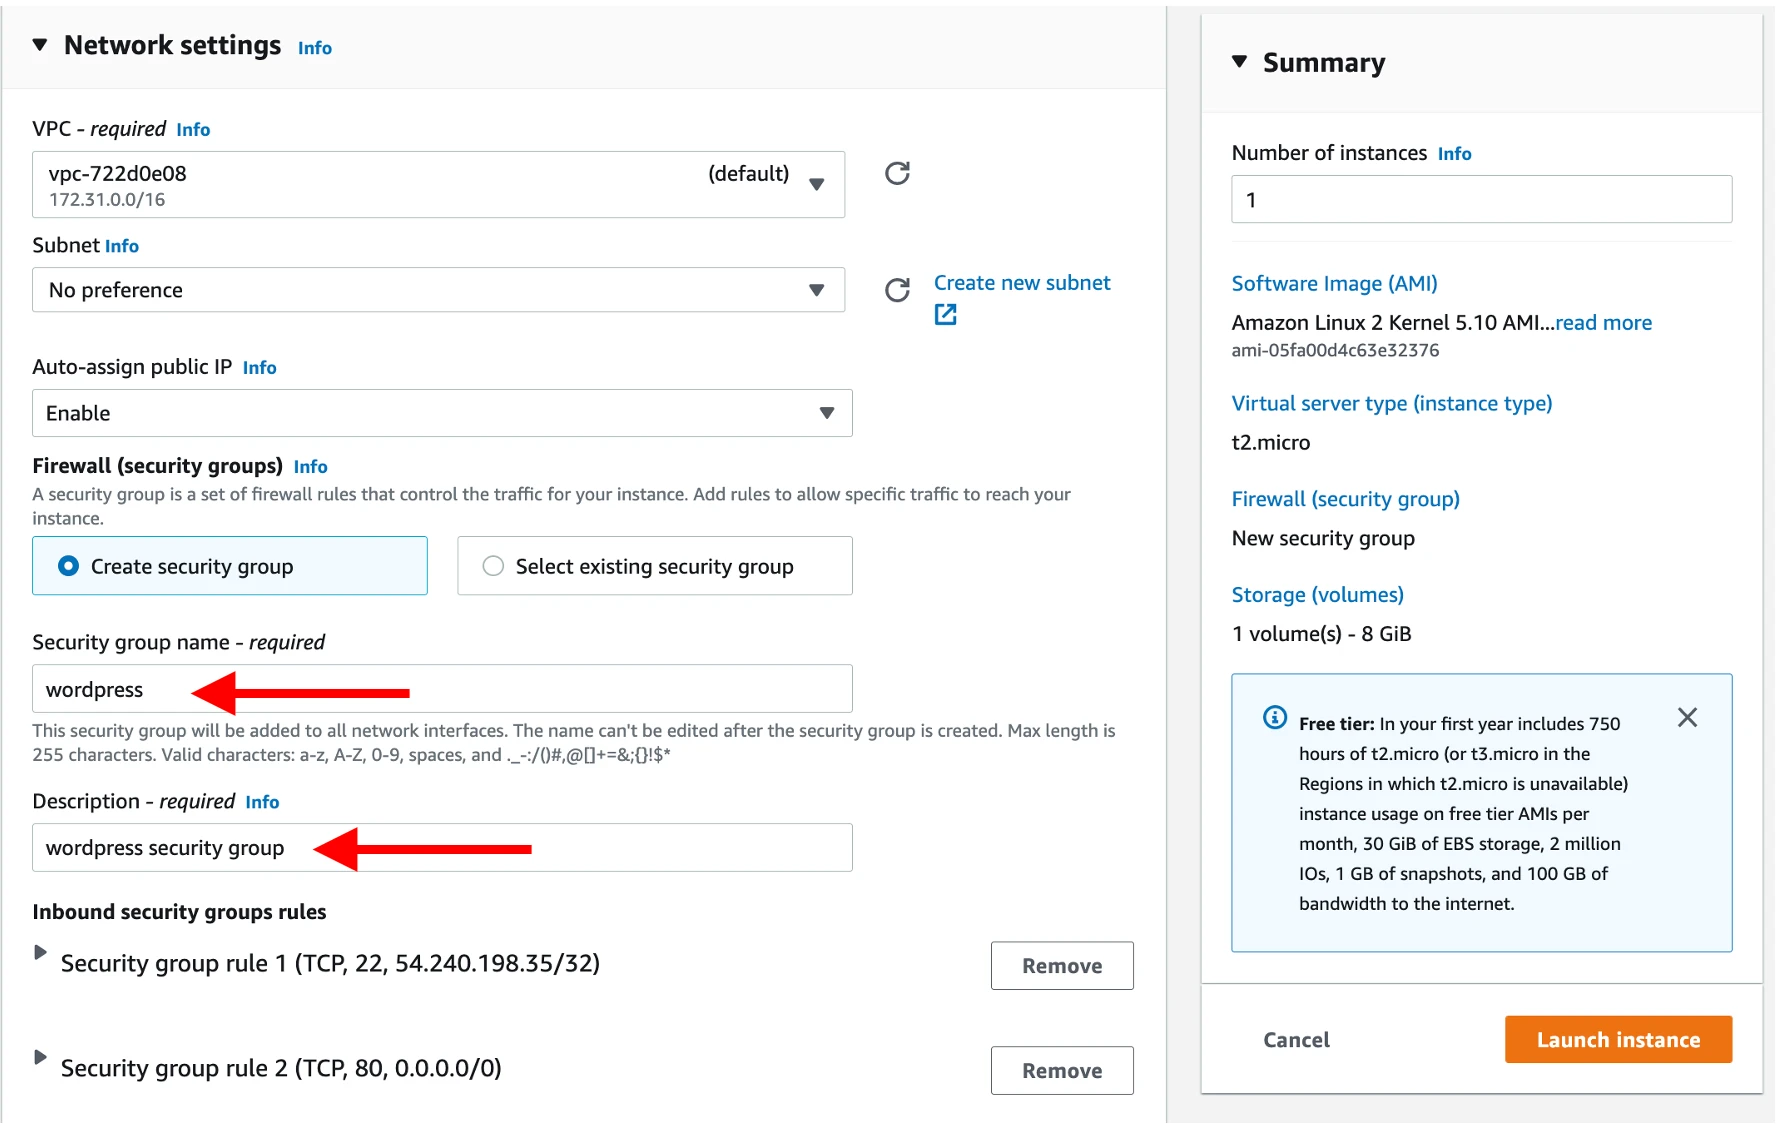
Launching the Instance
Configuring the Amazon RDS Database
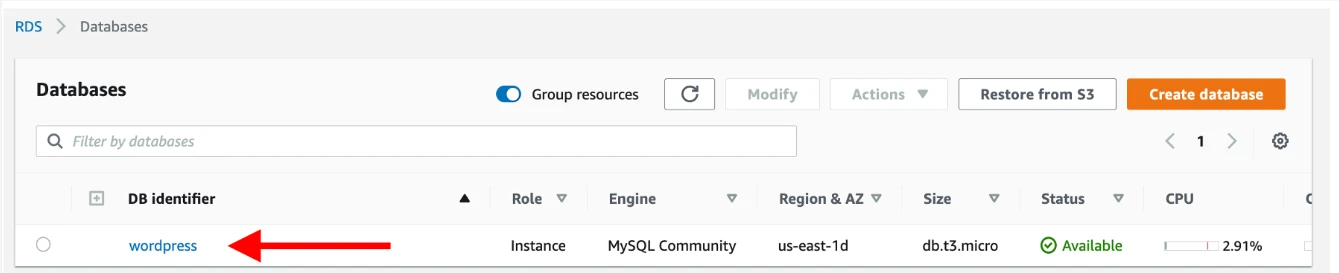
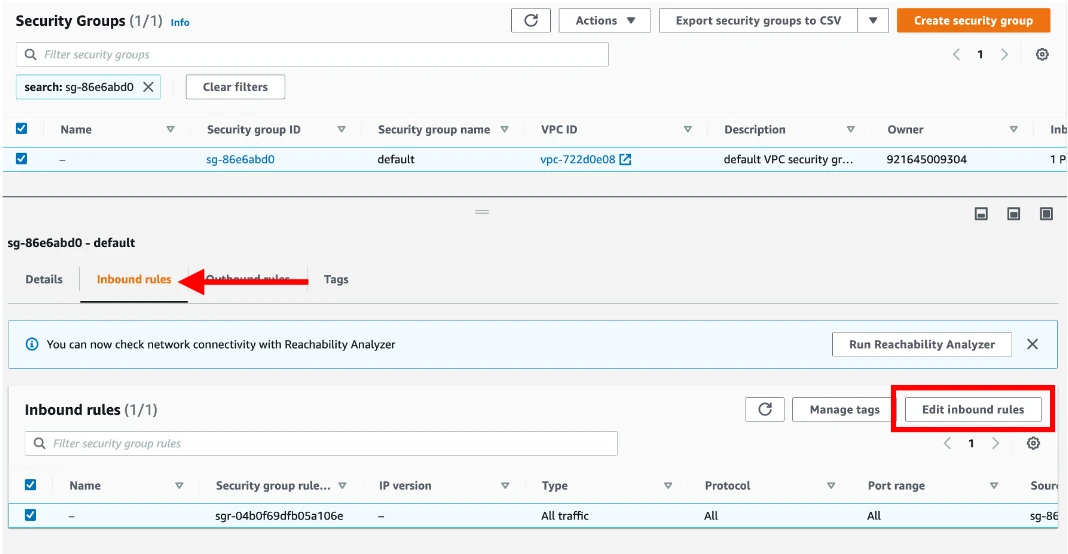
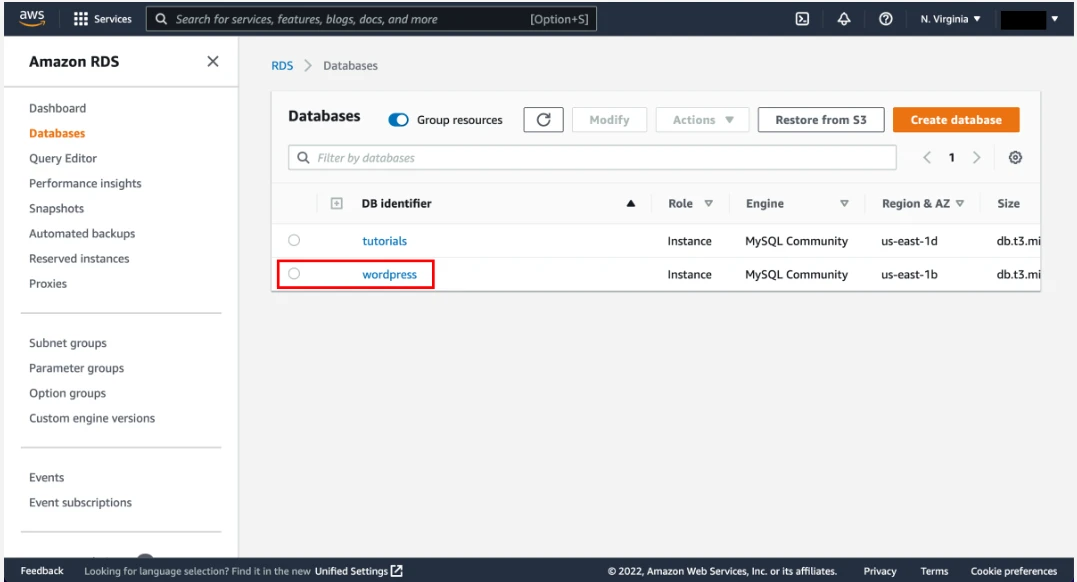
In the RDS databases section, select the MySQL database previously created.
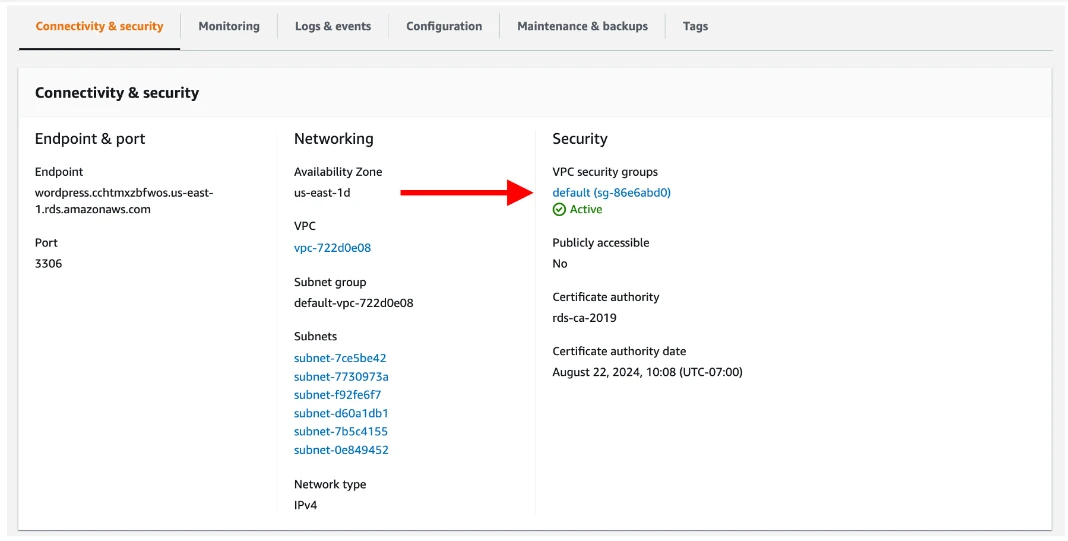
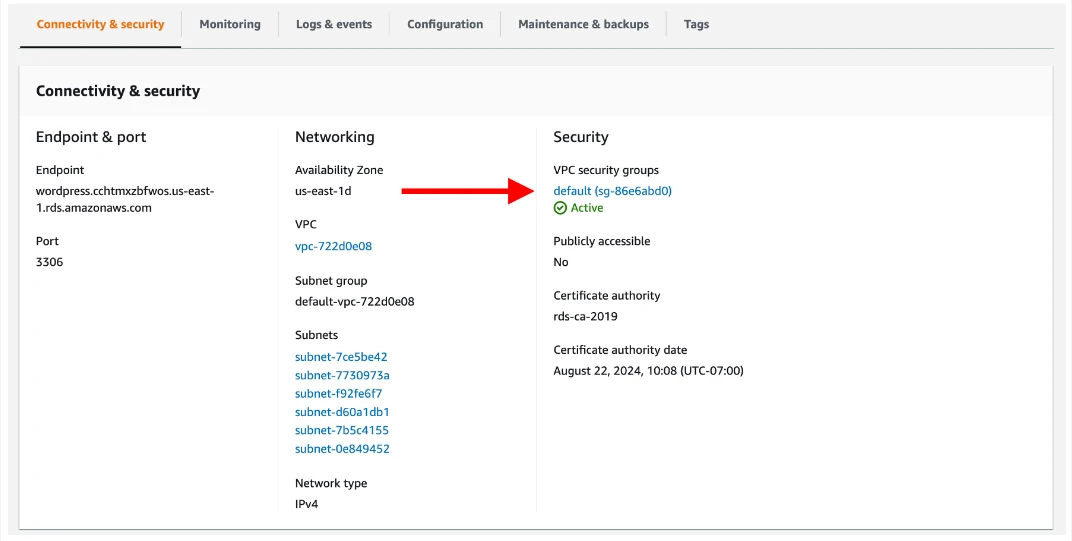
In the “Connectivity and Security” section, choose the Security Groups listed under VPC Security Groups.
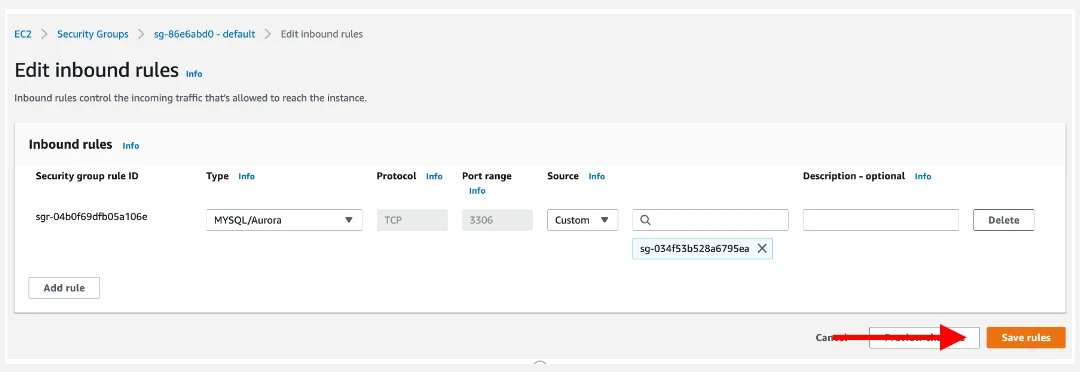
Next, edit the inbound rules since the default security group allows all inbound traffic from other instances. Since our WordPress instance is not in that security group, it will not have access to the RDS database.
Change the type to MySQL/Aurora to adjust the protocol and port. Then, delete the current value of the security group configured for the source.
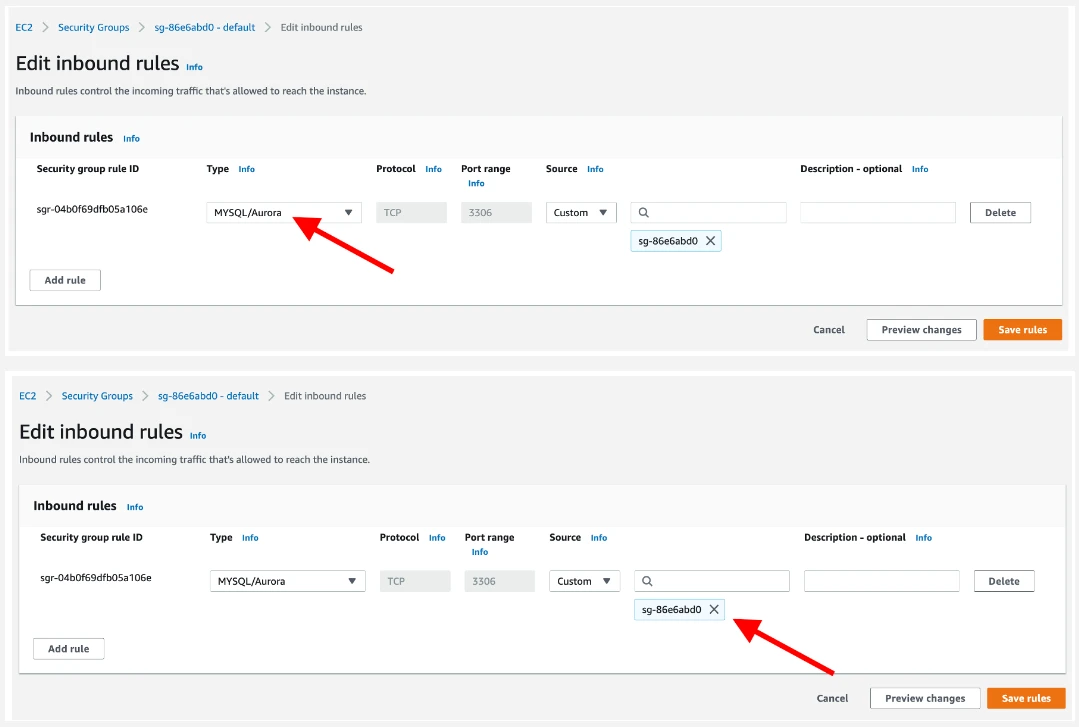
For “Source,” enter “wordpress,” and the console will display the available groups configured. Choose the “wordpress” security group we use for our EC2 instance.
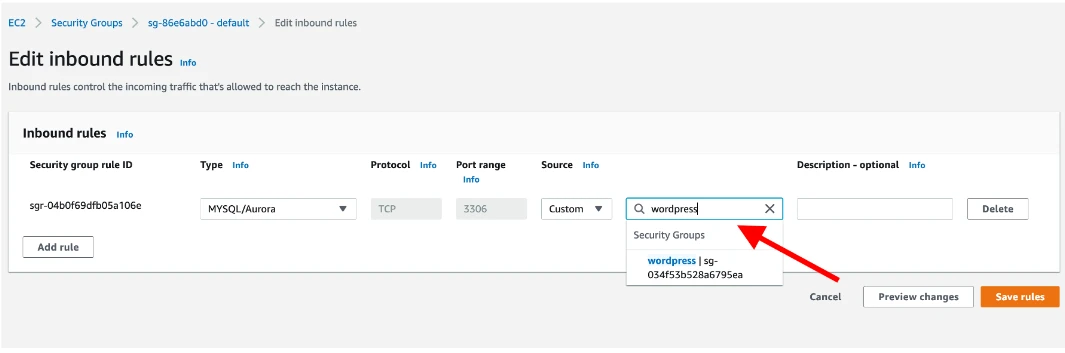
Once you’ve selected the “wordpress” security group, the field will populate with its ID. This rule enables MySQL access to any EC2 instance configured in that security group.
SSH into the Instance
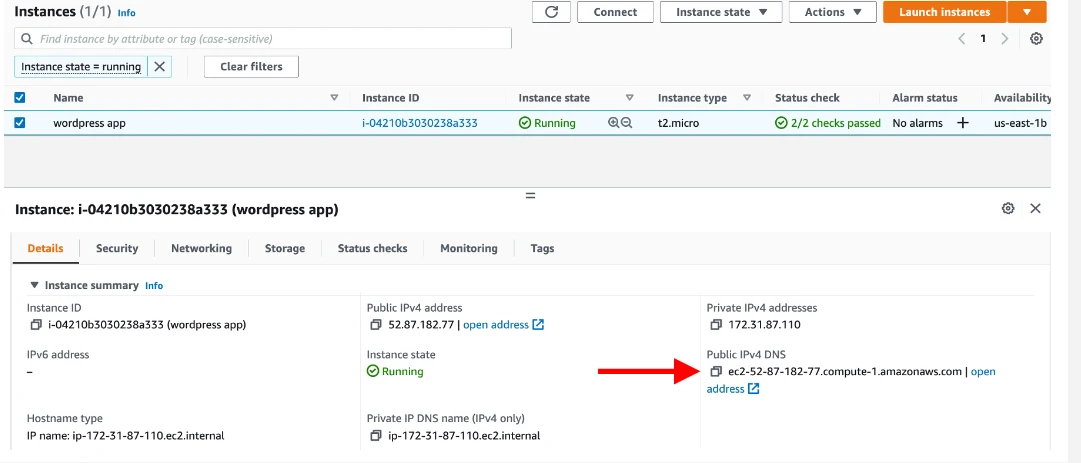
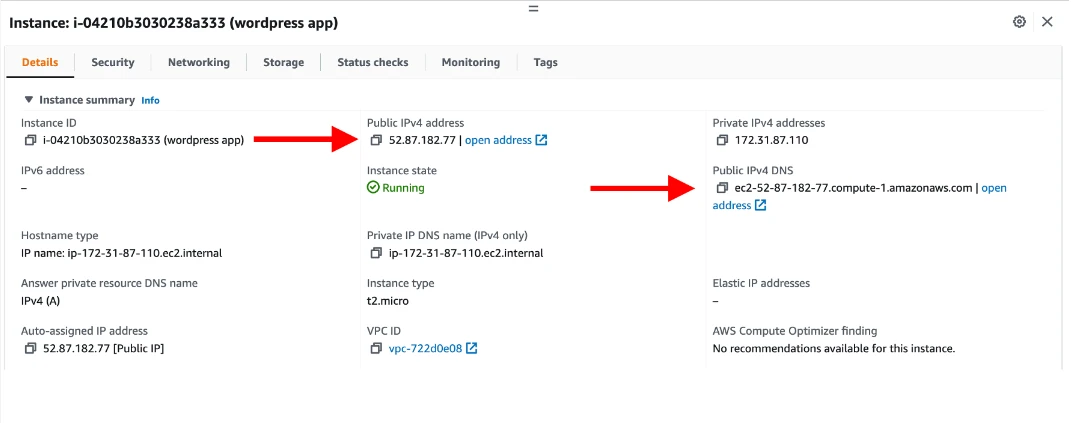
Using the public IP address, log into the instance.
Module 3: Configuring the Database with Amazon RDS
Details
First, modify our Amazon RDS database to allow network access from your EC2 instance.
In the previous module, you created security group rules to allow SSH and HTTP traffic to your WordPress EC2 instance. The same logic applies here. This time, you want to allow certain traffic from your EC2 instance to your Amazon RDS database.
a. To configure this, go to the Amazon RDS databases page in the AWS console. Select the MySQL database created in the previous module.

The primary security group has a rule that allows inbound traffic from other instances in the same primary security group. However, since your WordPress EC2 instance is not in that security group, it will not have access to the Amazon RDS database.
Change the “Type” property to MYSQL/Aurora, which will automatically update “Protocol” and “Port range” to the appropriate values. Then, remove the current security group value configured for “Source.”
For Source, enter “wordpress.” The console will show the available security groups configured. Select the “wordpress” security group used for your EC2 instance.
Once the “wordpress” security group is selected, the security group ID will populate. This rule will allow MySQL access for any EC2 instance configured in that security group.
Connecting to the EC2 Instance via SSH
Now that our EC2 instance has access to the Amazon RDS database, we’ll use SSH to connect to the EC2 instance and run some configuration commands.
a. Go to the EC2 instances page in the console. You should see the EC2 instance created for the WordPress installation.
b. The .pem file downloaded for your instance’s key pair should be in your Downloads folder.
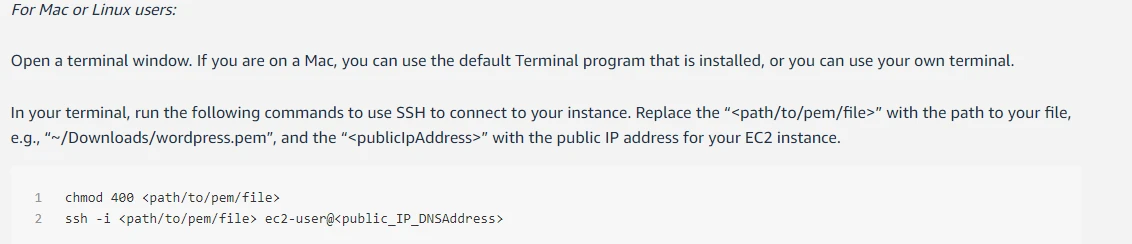

For Windows users, use tools like Putty, MobaX, etc.
Creating a Database User
We need an active SSH session to our EC2 instance in the terminal. Now, let’s connect to our MySQL database.
Install the MySQL client with the following command:
sudo yum install -y mysql*Note: If there’s an error, check if you launched the correct EC2 instance in Module 2.
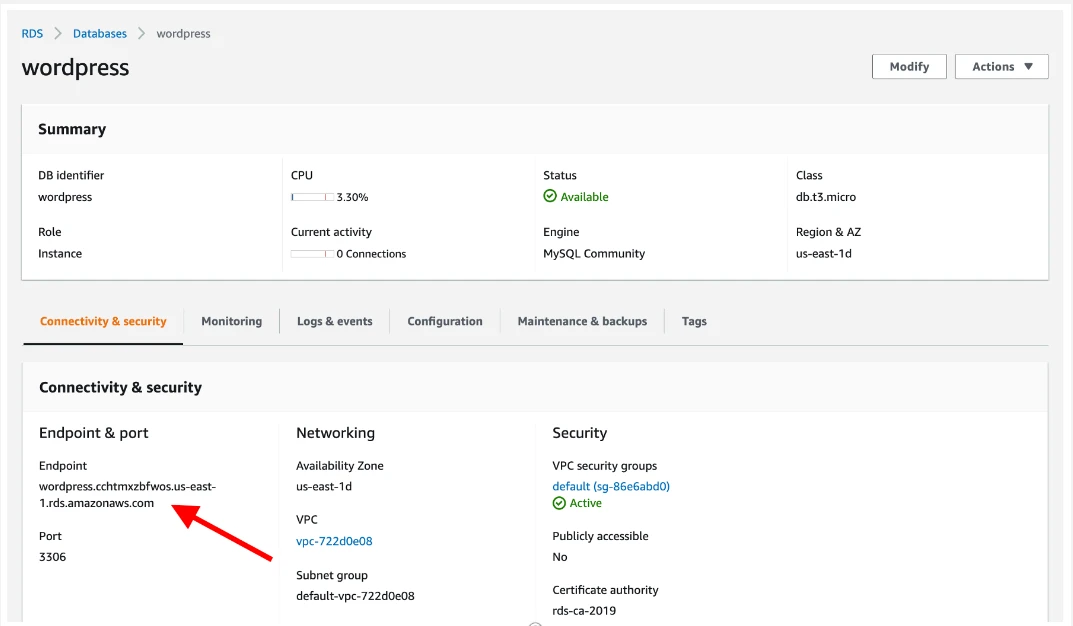
Next, find the hostname for our Amazon RDS database in the AWS console. In the database details, the hostname appears as “Endpoint” under Connectivity & Security.
а. Следно гледаме на страницата со Amazon RDS бази на податоци во AWS конзолата. Треба да ја видиме базата на податоци „wordpress“ што ја создадовме со инсталацијата на WordPress. Ја селектираме за да го пронајдете името на хостот за вашата Amazon RDS база на податоци.
б. Во деталите за нашата Amazon RDS база на податоци, името на хостот ќе биде прикажан како „Endpoint“ во делот Connectivity & security.
To set an environment variable for your MySQL host, enter this in the terminal, replacing “<OUR-endpoint>” with your database’s hostname:
export MYSQL_HOST=<OUR-endpoint>To connect to the database, use:
mysql --user=<user> --password=<password> wordpressCreate a database user for your WordPress app:
CREATE USER 'wordpress' IDENTIFIED BY 'wordpress-pass';
GRANT ALL PRIVILEGES ON wordpress.* TO wordpress;
FLUSH PRIVILEGES;
EXIT;
As a best practice, we should use a stronger password than “wordpress-pass” to protect our database.
Module 4: Configuring WordPress on EC2
Details
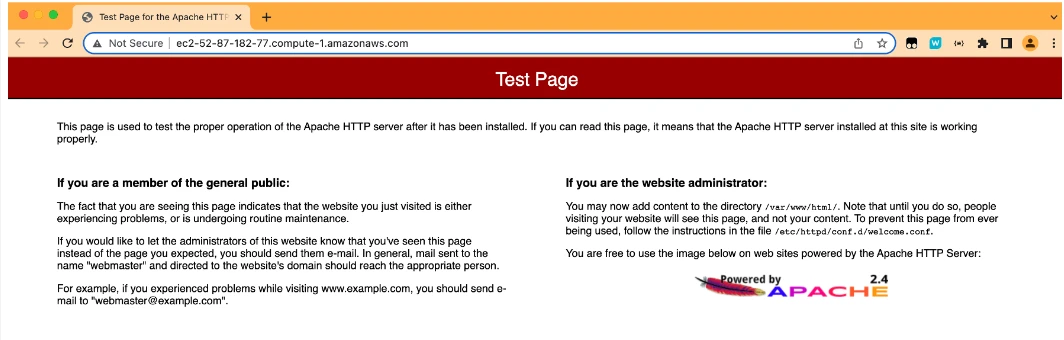
Installing the Apache Web Server
To run WordPress, we need a web server on our EC2 instance. Apache, an open-source web server, is the most popular web server used with WordPress.
To install Apache on the EC2 instance, we execute the following command in the terminal:
sudo yum install -y httpdTo start the Apache web server, we execute the following command in the terminal:
sudo service httpd startWe can check if your Apache web server is running and if our security groups are configured correctly.
Next, we go to the EC2 instances page and locate our instance.
Downloading and Configuring WordPress
First, we download and unpack the software by executing the following commands in the terminal.:
wget https://wordpress.org/latest.tar.gz
tar -xzf latest.tar.gz
If you run the ls command to view the contents of our directory, you’ll see a .tar file and a directory named wordpress with the extracted contents.
$ lsThe result should look something like this:
[ec2-user@~]$ ls
latest.tar.gz wordpress
Change the directory to the *wordpress* directory and create a copy of the standard configuration file using the following commands:
cd wordpress
cp wp-config-sample.php wp-config.php
Then, open the `wp-config.php` file using the nano editor by executing the following command:
nano wp-config.phpYou need to edit two parts of the configuration.
First, update the database configuration by changing the following lines:
// ** MySQL settings - You can get this info from your web host ** //
/** The name of the database for WordPress */
define( 'DB_NAME', 'database_name_here' );

/** MySQL database username */
define( 'DB_USER', 'username_here' );

/** MySQL database password */
define( 'DB_PASSWORD', 'password_here' );

/** MySQL hostname */
define( 'DB_HOST', 'localhost' );
Replace <your-endpoint> with the host of your Amazon RDS database.
The values should be as follows:
- DB_NAME: „wordpress“
- DB_USER: The username we created in the database in the previous module
- DB_PASSWORD: The password for the user we created in the previous moduleл
- DB_HOST: The hostname of the database that we found in the previous module
The second section we need to configure is the **Authentication Unique Keys and Salts**. In the configuration file, it looks like this:
/**#@+
 * Authentication Unique Keys and Salts.
 *
 * Change these to different unique phrases!
 * You can generate these using the {@link https://api.wordpress.org/secret-key/1.1/salt/ WordPress.org secret-key service}
 * You can change these at any time to invalidate all existing cookies. This will force all users to have to log in again.
 *
 * @since 2.6.0
 */
define( 'AUTH_KEY',         'put your unique phrase here' );
define( 'SECURE_AUTH_KEY',  'put your unique phrase here' );
define( 'LOGGED_IN_KEY',    'put your unique phrase here' );
define( 'NONCE_KEY',        'put your unique phrase here' );
define( 'AUTH_SALT',        'put your unique phrase here' );
define( 'SECURE_AUTH_SALT', 'put your unique phrase here' );
define( 'LOGGED_IN_SALT',   'put your unique phrase here' );
define( 'NONCE_SALT',       'put your unique phrase here' );
Go to this link to generate values for this configuration section.
We can replace the entire section with the content we obtain from the link.
We can save and exit nano by entering CTRL+O (to save), then [ENTER], and then CTRL+X (to exit).
Install the application dependencies needed for WordPress. In your terminal, execute the following command:
sudo amazon-linux-extras install -y mariadb10.5 php8.2Change the directory to the appropriate path by executing the following command:
cd /home/ec2-userCopy the files of your WordPress application to the /var/www/html directory used by Apache:
sudo cp -r wordpress/* /var/www/html/Finally, restart the Apache web server to apply the changes:
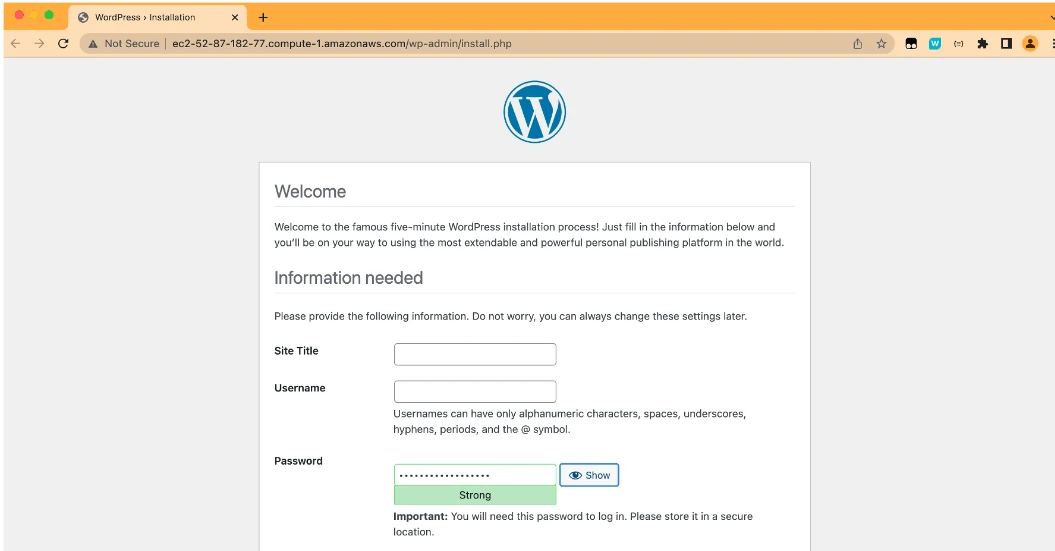
sudo service httpd restartThen, the WordPress welcome page and the five-minute installation process should appear.
That’s it! We now have an active, publicly accessible WordPress installation that is fully managed with a MySQL database on Amazon RDS.
Module 5: Exploring Our New Website and Deleting Resources
Details
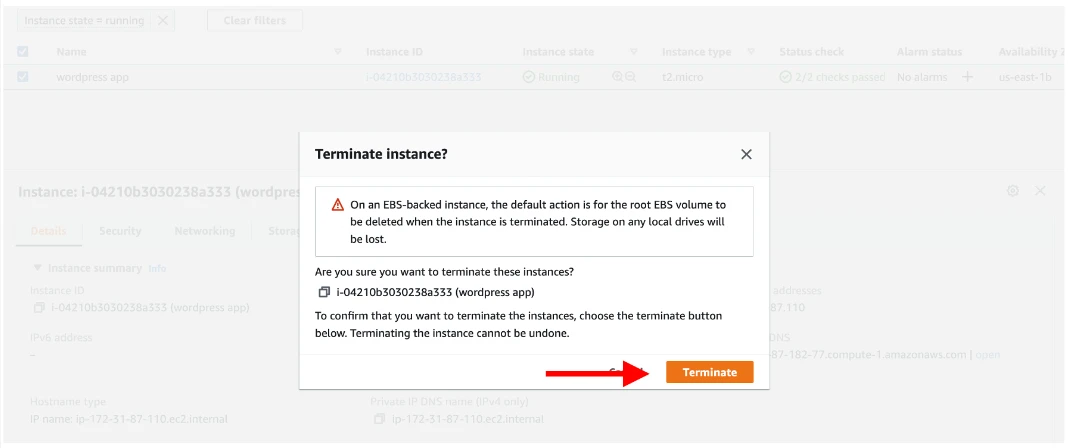
Removing Our EC2 Instance
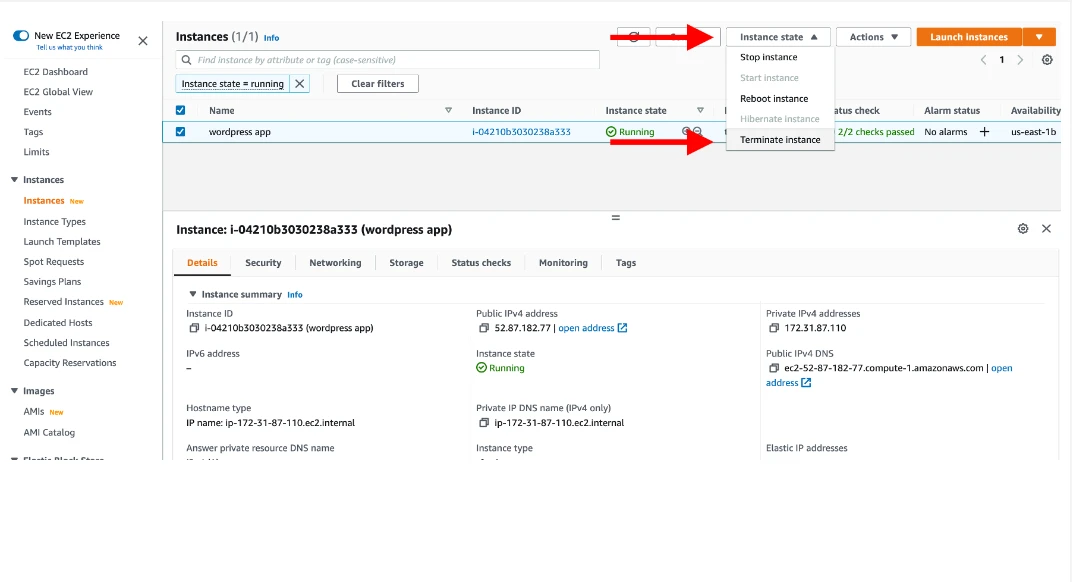
Select the **Terminate** button to stop your instance.
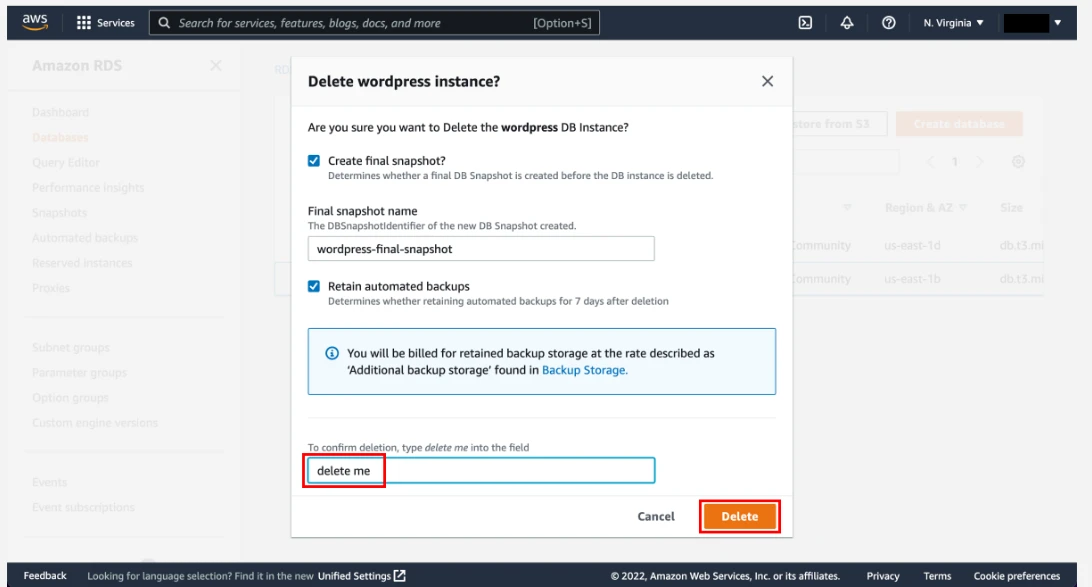
**Removing the Amazon RDS Instance**
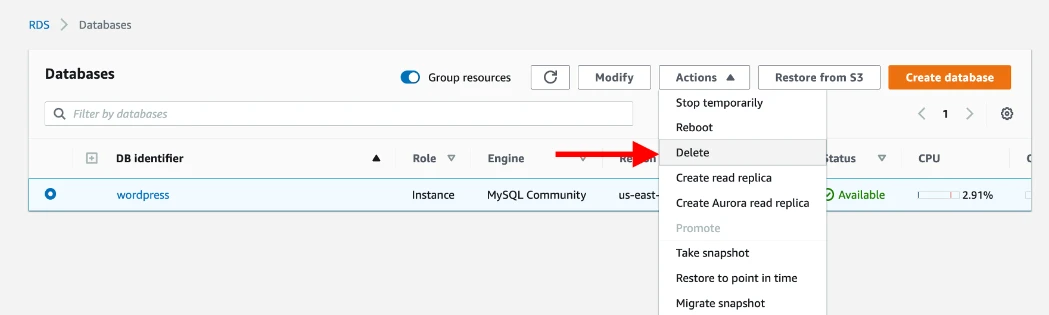
Terminate the EC2 instance and delete the Amazon RDS instance. Confirm by typing “delete me” to complete the deletion.